
Sometimes while browsing the internet, we will see interesting things and we will want to share them with people. Except that sending a full link is sometimes not the most practical thing. It is in this scenario that the screenshot on Mac becomes a preferred option for quite a few users.
Except that if everyone knows how to do it on Windows which literally has a “Print Screen” button, it's not as easy on Mac and especially if you're new to this type of machine.
So, in this article, we not only explain how it works, but on top of that, we give you a lot of little tips that will make your life easier!
How to take a screenshot on Mac?
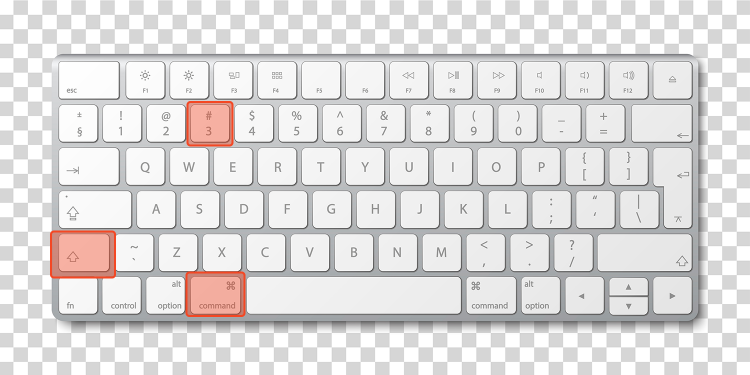
When we think of the screenshot At first glance, we think of this stupid and nasty capture of the entire screen. Although it is often not precise, it is nevertheless useful in certain cases.
Well, know that it is entirely possible to take a screenshot on Mac this way. To do this, you will simply have to press a specific key combination.
This combination is: Shift+Command+3. It's a little more complicated than Windows since you will have to click on three buttons at once, but it is generally the same functionality.
Capture only part of what is displayed
We just told you, this capture is “stupid and nasty”. If you're not necessarily looking to do something clean or precise, most of the time you won't necessarily need more.
Except that sometimes, we want to capture a very specific portion of our screen and in this case, we want to capture something more precise. Well, it's entirely possible, but it's not the same shortcut.
Indeed, this time you will have to do Shift+Command+4. Once you have pressed these three keys, you will have a pointer that will appear on your screen to select the area you want to capture.
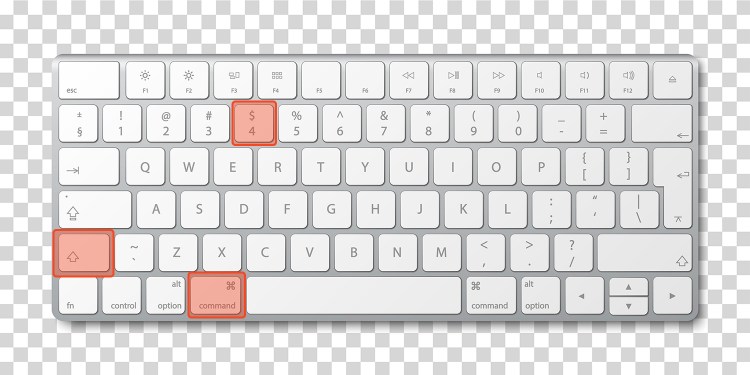
All you have to do is drag it to the desired area. If you want to move the pointer, hold space while you drag it. Once it's done, release and you will have your screenshot on Mac.
If you ever wanted to finally cancel this capture, you would just have to click on the “Escape” at the moment the pointer appears and it will simply disappear from your screen, nothing too complicated!
How to capture only one window?
If the previous capture is more precise, it still asks you to manually choose the area you want, and this is not always something very predictable in terms of rendering.
So, know that if you want to capture an entire window, it is also possible to use a third shortcut. To do this, do the same manipulation as for the partial capture, i.e.:
Shift + Command + 4, but in addition, hold down the space key !
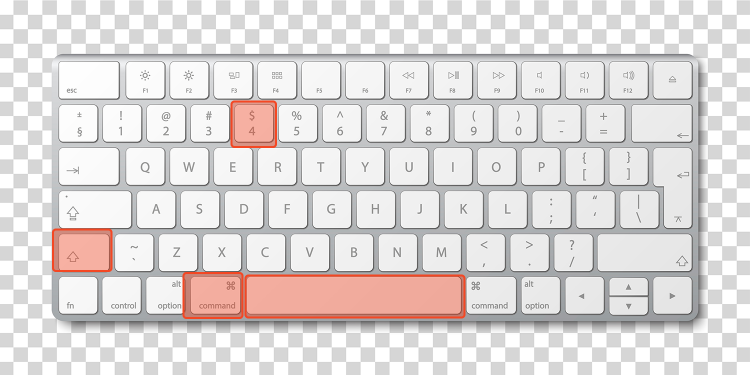
You will then have a camera-shaped cursor that will appear. It will then be up to you to click on the window you want to capture to validate. So these are the three methods to take a screenshot on Mac.
How to take a professional screenshot on Mac?
After seeing the basic built-in Mac methods for taking screenshots, it's important to mention that there are third-party tools that offer more flexibility and advanced features.
One of these tools is shottr, a professional and free software for taking screenshots on Mac.
Shottr is a bit of a professional for taking screenshots for your Mac. Imagine having a tool that not only takes photos of your screen, but also allows you to edit them, annotate them, and even share them in just a few clicks.
To use Shottr on your Mac, follow these steps:
- First, download Shottr from its official website, then proceed with its installation.
- Next, open Shottr. You'll quickly notice an icon in your Mac's top menu bar.
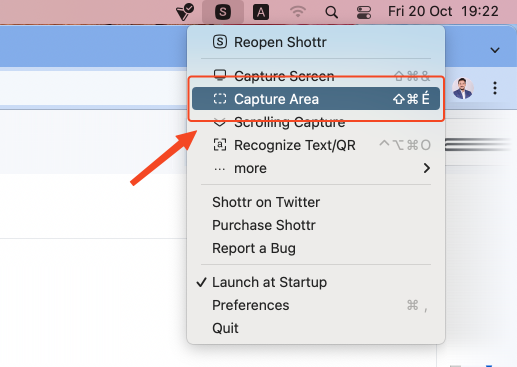
- Subsequently, a capture method that Shottr makes available to you. Whether for an entire window, a specific area of the screen or the entire display.
- After capturing, add annotations, underline key elements, or insert shapes to better illustrate your points.
- Finally, once you are satisfied with your changes, save the capture to the folder of your choice.
There you go, you now know more about taking screenshots on Mac.
Things where you can't take a screenshot on Mac
Except that you have to understand that it is not possible to capture absolutely everything! Some content cannot be subject to this type of manipulation at all and it is better to know which ones to avoid an unpleasant surprise.
Overall, assume that any application that is used to distribute licensed content will block your screenshots. Indeed, otherwise, it would be very easy to make recordings of films and series for example.
The rule obviously has exceptions. Some applications with sensitive data may also decide to block these captures. The idea will be to prevent someone with bad intentions from recovering the information.
Conclusion
While it is true that things are a little more complex than what can be found on Windows, the possibilities offered to us are still quite nice, like the universal clipboard that we have just told you about!
Another interesting point, the different shortcuts which will allow you to achieve the best possible capture according to your needs. So you no longer have any excuse not to succeed in your next capture on Mac!
