
Alors que le teleworking is becoming more and more popular around the world, we are increasingly led to work on our own computer, which will serve us in several areas. The problem is that to avoid being lost it is better have multiple desktops on Mac.
Fortunately, there is a solution that will allow you to organize yourself much more easily in your work routine, the tool Mission Control. In this article, we present it to you in more detail and show you how to add, manage and delete new virtual desktops in the blink of an eye on your machine.
Why create multiple desktops on Mac?
Before seeing in more detail how to create multiple desktops on Mac, it is appropriate first of all to introduce you a little Mission Control and above all the functionalities of the latter.
The idea here will be to simulate the fact that you have several computers on one and the same Mac. You will be able create multiple virtual desktops between which you can navigate.
Let's take an example, for example you can create a virtual office specially dedicated to work where you will find all the applications and data necessary for the smooth running of your day, and only these.
Once you're done, all you have to do is switch to a more classic desktop where you will have everything available again. The next day, when you return to work, return to the dedicated desktop, etc. This is a special case, but creating several desktops on Mac will have a whole lot of uses!
Mission Control on macOS: what is it?
Before we dive into creating multiple desktops, let's take a moment to understand what exactly is Mission Control.
Mission Control, it's like the command center of your Mac. Imagine a place where every window, every open application, is presented clearly, like cards spread out on a table.
With one click or tap, Mission Control brings it all together, letting you quickly see and choose where you want to go.
Instead of searching everywhere, everything is in front of you. And the most beautiful? If you have different tasks, like homework on one side and music on the other, you can create separate "desks" for each activity. This makes things even tidier and easier to manage.
How to create a new desktop with Mission Control?
Now that we have seen that creating several desktops on Mac is something practical, let's move on to the latter by looking at the procedure to follow, and the first thing to do will be to open Mission Control.
For this you have several options:
- Either you press the button
F3of the keyboard,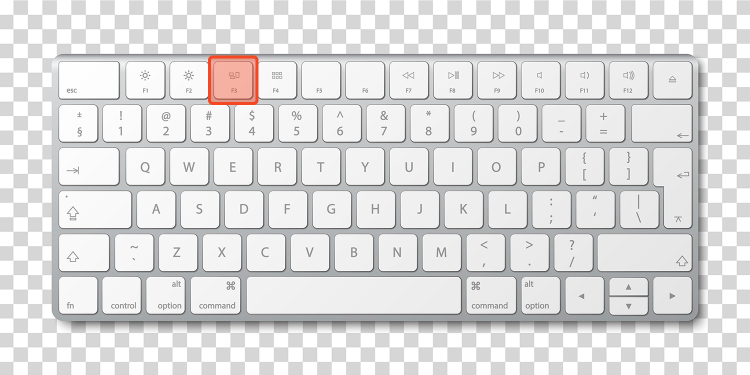
- either you swipe the touchpad upwards with 4 fingers,

- or you click with two fingers on Apple's wireless mouse.

Once you open Mission Control, everything will happen at the top of the screen. There you should see only your current desktop appear. On the right you have a symbol in the shape of + .
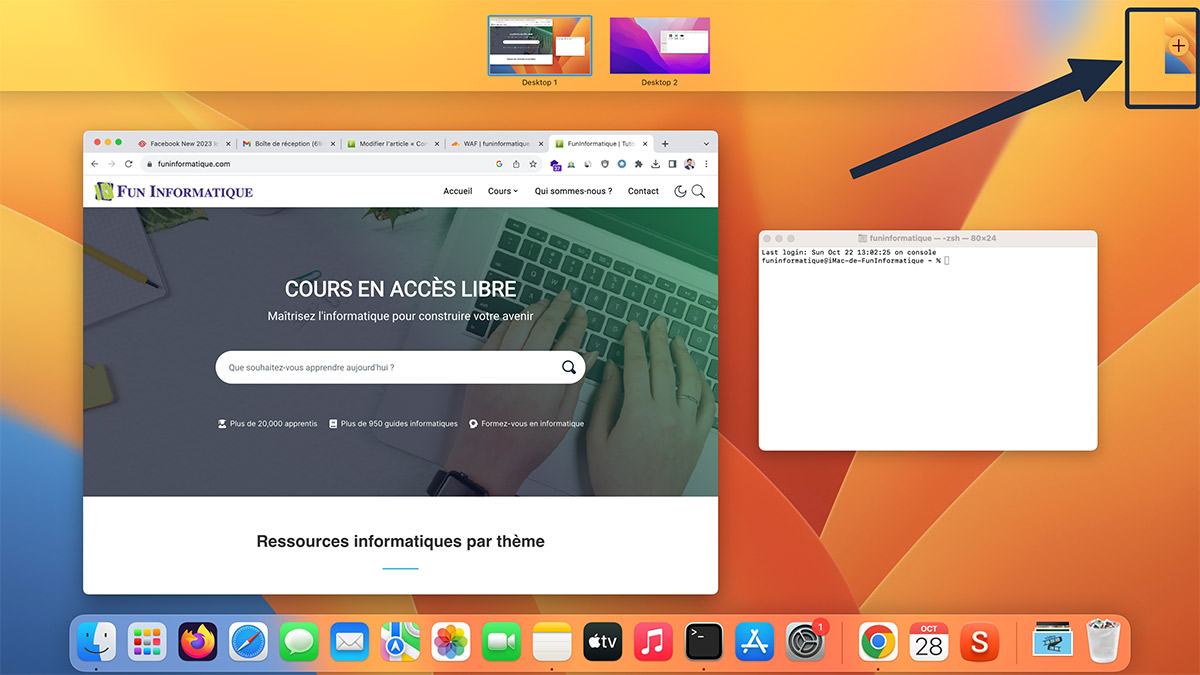
It is on the latter that you will have to click. Once this is done, you will have created a new space. This way, you will be able to create as many desktops on Mac as you want.
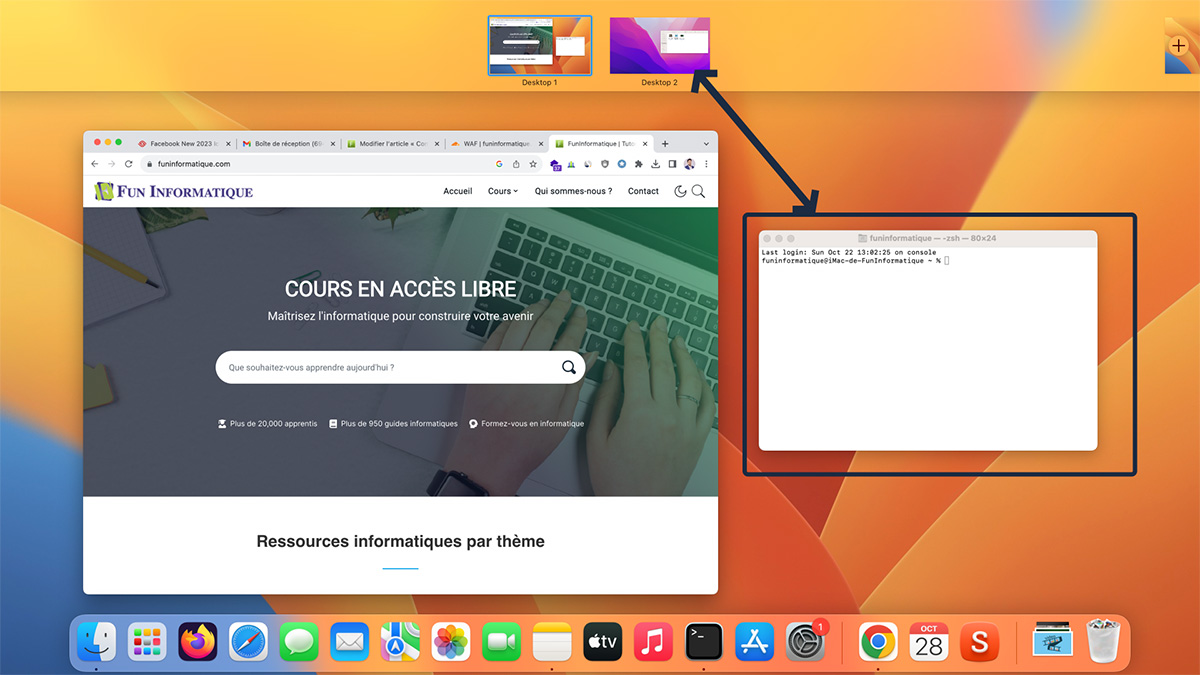
If you want to wander between the different virtual offices that you have created, there is nothing rocket science. In fact, you just need to go to the Mission Control menu using one of the three methods seen previously.
When you arrive there, at the top of the screen, the different desktops will appear. Simply choose the one you want to use at that moment. It's simple and almost instantaneous!
How do I assign apps to desktops on Mac?
We saw how desktops on mac worked, how to create them and how to walk between offices. Now all we have to do is look at the applications to put there.
On this point, we let you make your choices according to what suits you best. However, where we can help you is to give you instructions on how to add applications!
To do this, you must obviously have already created at least one additional virtual office. Then, all you have to do is follow the following steps step by step:
- Open the application you want to assign to a specific desktop.
- Go to mission control by holding down
F3pressed. - Drag the application window to the desktop of your choice (you can drop it on the desktop icon at the top of the screen).
Permanently assign an application to a desktop on a Mac
After seeing how to move an application to another desktop, let's now see how to permanently assign it to a specific desktop on your Mac:
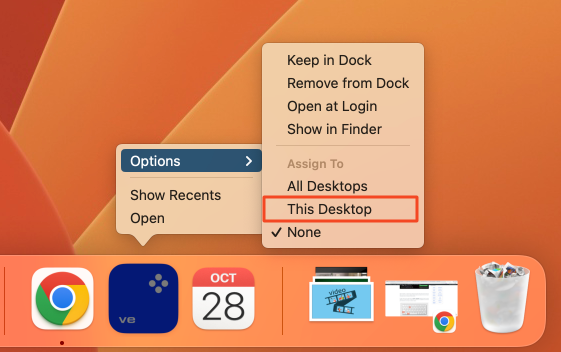
- Look at the bottom of your screen to find the Dock where your applications are located.
- Find and open the application you want to assign to a specific desktop.
- Right-click (or two-finger-click on the trackpad) this app's icon in the Dock.
- In the menu that appears, hover your mouse over Options.
- A submenu opens. Here you have several choices:
Tous les bureauxif you want the app to appear on every desktop.Ce bureauso that it always opens on the current desktop.Aucunif you don't want to bind the application to a specific desktop.
- Simply choose according to your needs.
If you ever change your mind, there's nothing complicated to do. The first thing will be to go to a desktop where this application is present, and follow the same procedure as before.
Once you arrive at the moment where you are asked to choose in which of the Mac desktops to activate this application, you will only have to change to the option you want!
Delete a space you no longer need
Before leaving, we will have one last point to see together, that of deleting one or more of these desktops on Mac. Indeed, it can be useful to create one, even if it is temporary.
Once you no longer need it, you will then try to delete it so that it does not take up unnecessary space. You might suspect it, but it’s obviously possible to do it.
To do this, you will have to access Mission Control via one of the three access methods summarized below:
- The key
F3of your keyboard. - By sliding 4 fingers up on the touchpad.
- By clicking with 2 fingers on the Apple mouse.
Once you get to Mission Control, move the mouse to the top of the screen, as if you want to change virtual desktops. You will then see next to each desktop a small check mark appears.
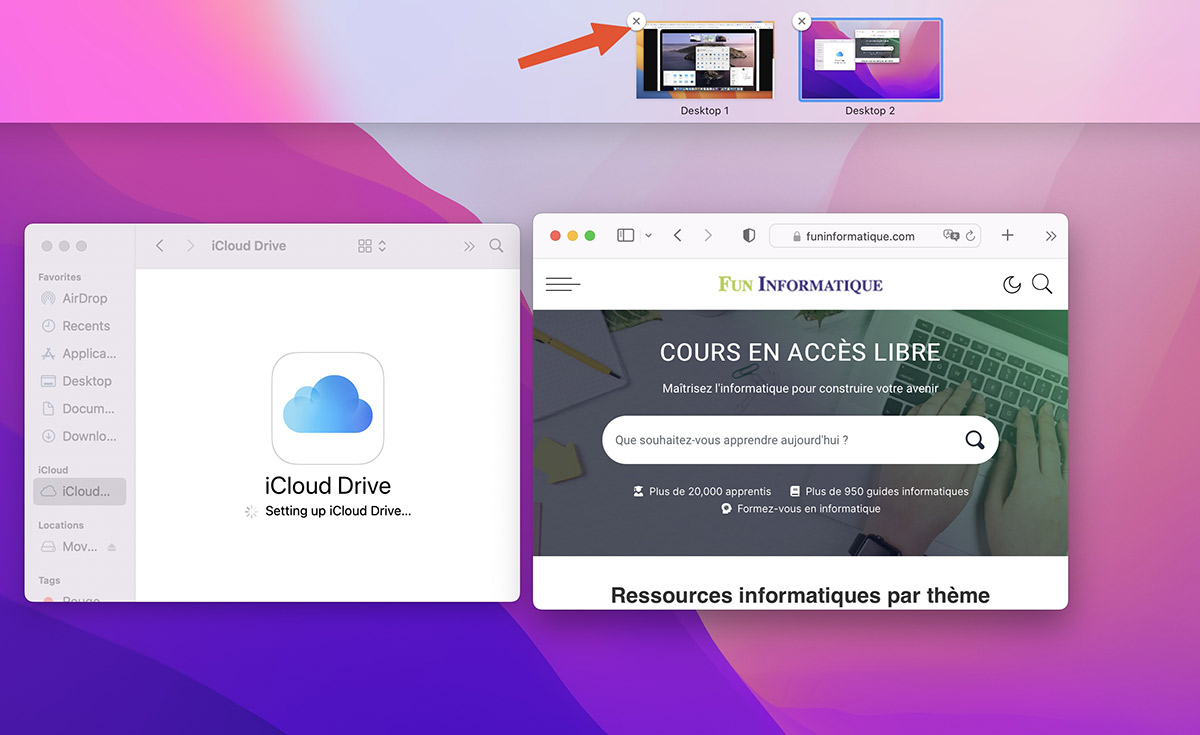
Simply click on the one that corresponds to the virtual desktop you want to delete. You will be asked for confirmation, and once everything is validated, the desktop will be deleted.
Conclusion
In summary, desktops on Mac are an element that is very important in terms of organization, especially if you use the computer for work, but also personally.
This helps you quickly sort between applications and therefore improve your work pace. Moreover, although the first time may be a little complicated, it will not take long for you to master all of this and be able to take full advantage of these virtual offices which you will then never be able to do without!
