
Last updated: January 27, 2023
You probably received an email from a sender you don't know. Maybe they claim to know you, but their email address doesn't reveal anything to you.
In any case, you want to know who is hiding behind this email address in order to know how to respond better. In this article, we will show how to trace an email address back to its owner.
Why trace an e-mail address?

First of all, why bother tracing the IP address of the email?
These days, malicious emails are all too common. Scams, spam, malware and phishing emails are commonplace in the inbox. Finding the source of this email will give you a chance to find out who and where the email came from.
In other cases, you can trace the origin of an email to block a persistent source of spam or abusive content, allowing you to free your inbox of these.
(If you wish to prevent the disclosure of your own identity by e-mail, learn how to send completely anonymous emails .)
How to trace an e-mail address?
Did you know that each email contains much more information than appears in most email clients? There is a wealth of sender information included in the email header, information you can use to trace the email back to the source.
You just need to know where to look, as well as what you're looking at.
To open the email header and find the message sender on different email providers, follow these steps below:
On Gmail
- Open your Gmail account.
- Select the email you want to trace.
- Then, in the upper right corner of the email, click the three dots to open a drop-down menu.
- Click on Show original to open the email header.

On Yahoo
- Open your Yahoo Mail account?
- Open the email message you want to inspect.
- Above the message pane, click the icon Plus.
- Select Show raw message. This opens a new tab where you can see the email header.

On Outlook
- Open your Outlook email account.
- Double-click the email message you want to view.
- Go to File>Properties.
- You will find what you are looking for in Internet headers.

On Apple Mail
- Open your Apple Mail account.
- Select and open the email message you want to trace back to its owner.
- Then go to View > Message > Raw Source to open the email header.
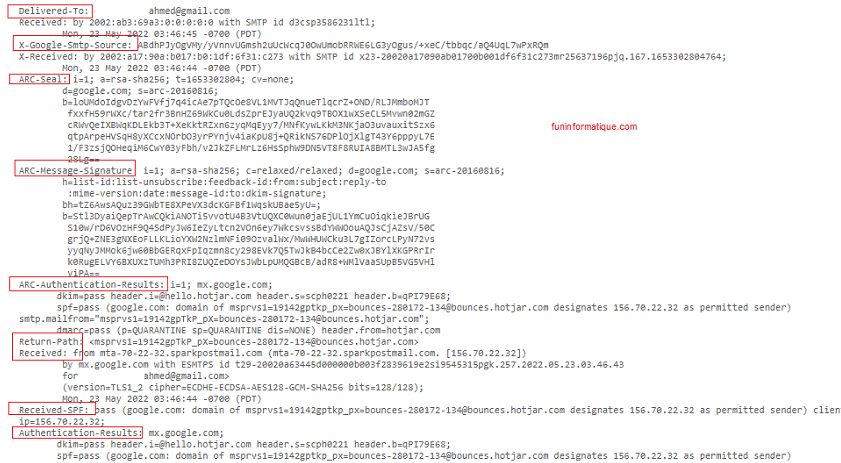
Understanding Email Header Data
Before diving into the email header to learn how to trace an email address back to its owner, we need to understand what data it contains.
- To: This is the sender of the email. However, do not rely on this as this information can be falsified by spammers.
- Date: : Displays the exact date the email was sent.
- Reply-To: This is the email address you send the response to.
- Subject: Obviously the subject of the email.
- Return-Path : This is an essential element that provides the email address to which the system will send its message. This is the location where unsent or bounced messages end up.
- Received: The "Received" line lists each server the email passes through before reaching your inbox.
- MIME-Version: MIME stands for Multipurpose Internet Mail Extensions and represents the email format standard currently in use.
- Content type: lets the email client or browser know how to “read” the content of the email. This will likely be either the UTF-8 and ISO-8859-1 character set.
- SignaturesDomainKeys and DKIM : By associating the domain name with the email, DomainKeys and DKIM (DomainKeys Identified Mail) signatures help email services recognize and authenticate messages.
- ARC-Authentication-Results: : ARC identifies email forwarders. It stands for authenticated receipt chain.
- ARC-Message-Signature: validates the email header information, much like DKIM does.
- ARC Seal: Verifies the content of the authentication results and the signature of the message.
- SPF received: The SPF or Sender Policy Framework is a part of email authentication that prevents forgery of the sender address of emails.
- X Google SMTP Source: indicates whether the email used the Gmail SMTP server to forward.
Info: you don't need to understand what all these words mean to trace an email. But if you learn to skim the email header, you can quickly find the sender of the email.
Find the original sender of an email
For trace the IP address of the original email sender , go to the second Received in the email header. Next to the first Received line is the IP address of the server that sent the email. Sometimes it appears as X-Originating-IP ou Original-IP.
Find the IP address, then head to MX-Toolbox . Enter the IP address in the box, change the search type to reverse lookup using the drop-down menu, then press Enter.

The search results will display a variety of information relating to the sending server.
3 free tools to track emails and IP addresses
Of course, there are tools that automate this process for you. It's convenient to learn about email headers easily, but sometimes you get the wrong information.
Check out the following header parsers:
- G Suite toolkit message header.
- MX Toolbox Email Header Analyzer.
- IP Address Email Header Trace (email header parser + IP address tracker).
However, the results do not always match.
Your success with tracking an email will vary depending on the sender's email provider. For example, if you try to locate an email sent from a Gmail account, you will only discover the location of the last Google server that processed your email, not the IP address of the original sender .