
Last updated: July 3, 2022
As you know, from time to time I share Ethical Hacking tutorials with you. In these tutorials I often work with the distribution Kali Linux successor to Backtrack.
However, I have found that many of my readers do not yet know how to install Kali Linux on their machine while leaving Windows intact.
Today I decided to write a tutorial on how to install Kali Linux on your machine Windows using the VirtualBox or VMWare program.
As you already know, Kali Linux is the best operating system for penetration testing. The objective of Kali Linux is to provide a distribution bringing together all the tools necessary for security testing of an information system.
And VirtualBox and Vmware player are programs that use virtualization. It is a technique which allows the creation of one or more virtual machines within the same operating system (generally Windows).
It is possible to run several virtual machines at the same time, the limit corresponding to the performance of the host computer.
Install Kali Linux under Windows 10 et Windows 7 with VirtualBox
In this video I will show you how to install Kali Linux with Virtualbox under Windows: step by step. This is a detailed guide on installing Kali Linux on VirtualBox.
Create a Kali Linux virtual machine on Windows with Vmware
Here we will see how install Kali Linux on your system Windows with VMWare software.
Step 1:
Start by download vmware. VMWare player is free but not free, you will still need to register to generate an activation key which will be requested during installation.
Then download kali linux iso file. The file occupies more than 3 GB. We save the file which can be reused in a special directory called “Disk Image” for example.
Once downloaded Vmware, launch the installation by double clicking on the executable. Continue the steps by clicking Next Next, Finish. Vmware Player is now installed on your computer. Open Vmware and click “Create New Virtual Machine”.

Step 2:
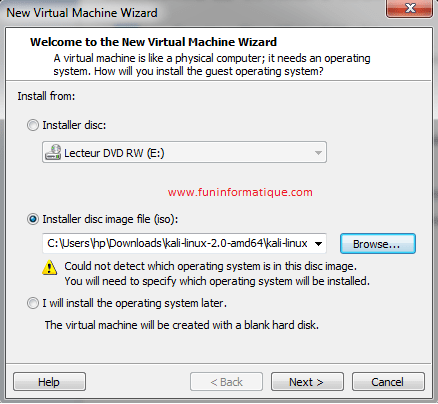
Select “Install disc image file (iso)”, then select the Kali Linux ISO file that you downloaded. Click “Next”.
Step 3:
In this step, select the type of operating system to install and then enter the name of the virtual machine. In my case, I will name it “ Funinformatique Kali Linux”. Also choose the location, I recommend that you create a folder called “Virtual machines” in my Documents. Then click Next.

Step 4:
Afterwards you must select the maximum size of the storage space that you wish to use for kali linux. I recommend using 30 GB. After change the next option to “Store virtual disk as a single file” and click Next.
Step 5:
In the following window, we must configure the virtual hardware that we will use in Kali Linux. So click on the “Customize Hardware” button.

Select “Memory”, and choose the size of memory you want to give to the Kali Linux system. For me, as I have 4 GB in my computer, I will choose 2 GB's (2048 Mb's).
Then click on Network Adapter. In this part, we are going to tell Vmware to use our computer's wifi card.
To do this, select the option Bridged and click the “Configure Adapters” button.
In the new window, deselect everything except your WIFI network card and click OK. You can now click Close at the bottom of the hardware window and click Finish.

Step 6:
Congratulations ! The new virtual machine file is now properly configured and is added to the VM library.
Now all you have to do is start your virtual machine! To do this, click on the name of the newly created virtual machine, then click on Play virtual machine.

After starting your virtual machine, you will have two options: either launch the Linux system live, or install it on the virtual machine's hard drive.

Live mode has the particularity of being able to launch a Linux system without installation on the hard disk. The Advantage live mode is that it allows you to test the system before installing it.
Its disadvantage, is that it is generally not possible to directly save the modifications made during the session. That is to say, once you shut down the system, all documents created and software that you have installed will be lost.
So it is better toinstall on your virtual machine.
How to install kali linux under VMWARE?
Step 1:
In the kali Linux boot menu, choose the “Graphic install” option and click Enter. In the next window, you will be asked to choose the system language.

Step 2:
Then choose your geographic location. Afterwards you must choose the language of your keyboard. Click on next, wait a few seconds for kali linux to detect your computer's hardware. Then you would have a window asking you to enter the name of your machine. Enter the name that suits you best/
Step 3:
Kali Linux will now ask you to enter a password for the root user. Make sure you can easily remember this password, if you forget it you will need to reinstall Kali Linux. Click continue after you have entered and re-entered the password of your choice.
Step 4:
Here, select the option “Assisted – use an entire disk” and click continue. Another window will ask you to confirm your choice. Click continue.

Step 5:
Then select the first option “All in one partition”. Click continue. Another window will ask you to confirm your choice. Click continue again.
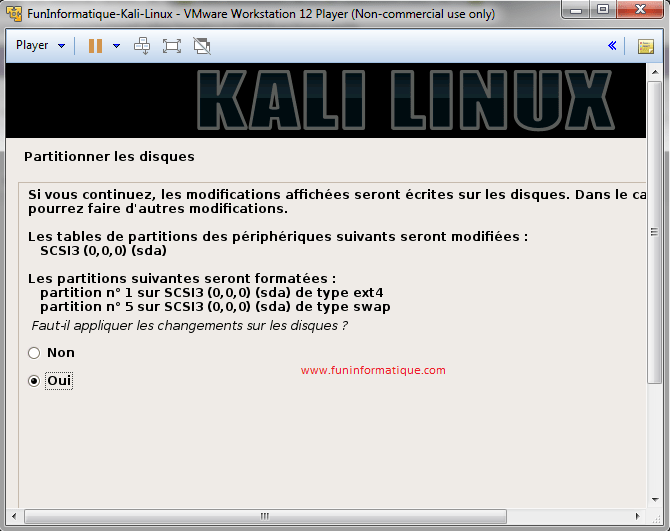
Step 6:
Last question! Confirm that you really want to make these changes by selecting the Yes option and clicking Continue.
The installation of Kali linux will now begin. On average, installation takes 30 min.
After a few minutes, the installer will ask you if you want to install the GRUB bootloader. Click Yes and continue. Finally select dev/sda and click continue.
After restarting, enter the login (root) and password.

Here you are with Kali in a virtual machine, ready to test your networks.