
Last updated: September 4, 2023
Are you looking for a simple and effective method to enlarge your images without losing the quality ? You've come to the right place, this article has all the answers you need!
Why does enlarging an image ruin its quality?
When an image is enlarged, it tends to lose sharpness, and details may become blurred. Why is this happening?
The main reason is related to how digital images are structured. Most images you encounter online (JPEG, PNG) are bitmap or raster. These images are made up of a mosaic of pixels, each with a specific color and brightness. When you look at the image as a whole, these pixels combine to create a cohesive image.
Let's imagine a mosaic of colored tiles. From a distance, the pattern or image on the mosaic is clear. However, if you move closer or enlarge the mosaic, you will start to see the individual tiles. Likewise, as you zoom or enlarge a bitmap image, individual pixels become increasingly visible, creating a pixelated effect.
When you enlarge an image, you are essentially asking your software to add more pixels. However, because the information for these new pixels does not exist in the original image, the software must "invent" them based on the existing pixels. This process is calledthe interpolation. Unfortunately, interpolation can lead to a blurry or distorted image, as shown in the image below:

Conversely, when you reduce the size of an image, the quality degradation is usually less noticeable. This is mainly because removing pixels when downsizing makes blocks of pixels less apparent.
It is for these reasons that enlarging an image is often a compromise between size and quality. However, with the advancement of artificial intelligence techniques, it is increasingly possible to minimize quality loss when enlarging images.
So what is the best solution?
The secret lies in the efficient filling of “gaps” when adding new pixels, ensuring that these harmonize with the pixels existing surroundings.
Understand that an image does not simply expand like a rubber band. In reality, when enlarging, new pixels are inserted. To maintain a consistent appearance and preserve image quality, these new pixels must adopt a color that matches that of neighboring pixels.
However, it is important to keep in mind the limitations of enlargement. You can't, for example, turn a small, low-resolution image into a high-quality poster. Even if the quality will inevitably degrade with enlargement, certain techniques make it possible to minimize this degradation and obtain relatively good results.

Among the most used techniques for image enlargement are fractal compensation and l'use of artificial intelligence. Fractal compensation generally provides better results than traditional interpolation methods when it comes to enlarging an image.
At the same time, artificial intelligence techniques, thanks to advances in deep learning, can more accurately predict which pixels to add during enlargement, often with superior results.
In the rest of this article, we will guide you through the process of using these two techniques to enlarge your image with the image editing software appropriate.
Enlarge an image without losing quality with Gimp
GIMP, historically recognized as a free alternative to Photoshop, offers an effective solution for enlarging images while minimizing quality loss.
Here are the steps to enlarge images using GIMP while preserving quality:
- First of all, download and install Gimp on your computer if you haven't already.
- Next, open GIMP and load the image you want to resize.
- Access the image scale and size functionality via the menu Image » Image scale and size.

Enlarge an Image Without Losing Quality with GIMP - Enter the new dimensions you want for your image.
- In the field 'Quality', select 'LoHalo' as an interpolation method. This method is particularly effective in minimizing quality loss when resizing.
- Click the 'Scale' button to apply the changes.

And now, voila ! You can now save your enlarged image to your computer.
Enlarge images using IrfanView
IrfanView is a popular and user-friendly photo editing software, especially suitable for beginner users. However, note that it is only available for operating systems Windows. The tool makes it easy to resize images, and this process is made simple with IrfanView.
Here's how to proceed:
- Start by download and install IrfanView on your computer.
- Once installed, open the image you want to resize with IrfanView.
- Access the resize option by navigating through the menu Image > Resize/Resample.

- In the window that appears, enter the new dimensions you want for your image.
- Finally, select Lanczos (slowest) from the filter drop-down menu. Be sure to check the box Apply sharpen after Resample to improve the sharpness of the image after resizing.
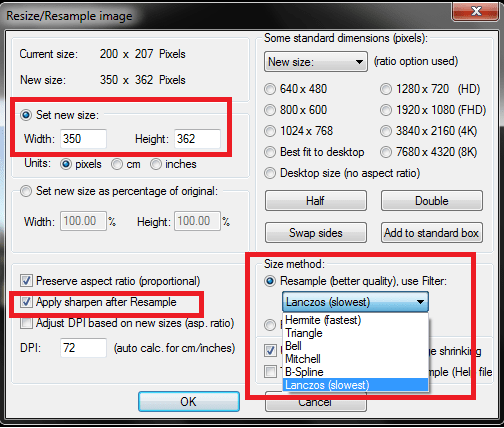
IrfanView will now resize the image according to your preferences. Once this process is complete, you can save your resized image to your computer.
To illustrate the effectiveness of this method, here is an example image before and after applying the resizing process with IrfanView

Obtain optimal enlargement with the help of Photoshop
For those looking for high-quality results, Photoshop, one of the most popular image editing software, offers a robust set of tools for enlarging images. Here are the steps to enlarge an image in Photoshop while preserving quality:
- Open Photoshop and load the image you want to enlarge.
- Go to the menu Image then select Image Size.
- In the dialog box that opens, you can enter the new dimensions of your image.
- In the section Resampling, make sure the option is enabled and the resampling method is set to Preservation of details 2.0. It is an advanced interpolation technique that uses artificial intelligence to preserve details when enlarged.

Enlarge an image without loss of quality with Photoshop - You can also adjust the level of noise reduction and detail preservation as needed.
- Once you have made these settings, click OK to apply the changes.
Your image is now enlarged with optimized quality. Don't forget to save your work when finished.
Use Topaz Labs Gigapixel AI to magnify an image
One of the AI-based image enlargement tools that has gained popularity is Gigapixel AI from Topaz Labs. Indeed, it uses machine learning and artificial intelligence to improve the quality of enlarged images.
This is a significant advance over traditional image enlargement methods that rely on interpolation algorithms.
Here's how to use Gigapixel AI to enlarge an image:
- Start by install Gigapixel AI on your computer. Topaz Labs offers a free trial version, which allows you to try the tool before deciding to purchase it.
- Once installed, open Gigapixel AI and import the image you want to enlarge by clicking Open or by dragging and dropping the image into the program window.
- In the field Resize, enter the desired size for your image.

Gigapixel AI from Topaz Labs to enlarge an image without losing quality - Then let Gigapixel AI process your image. Processing time will vary depending on the size of the image and the enlargement level chosen.
- Once the image is processed, you will be able to preview the result before exporting it. Finally, click Save to save the enlarged image to your computer.